
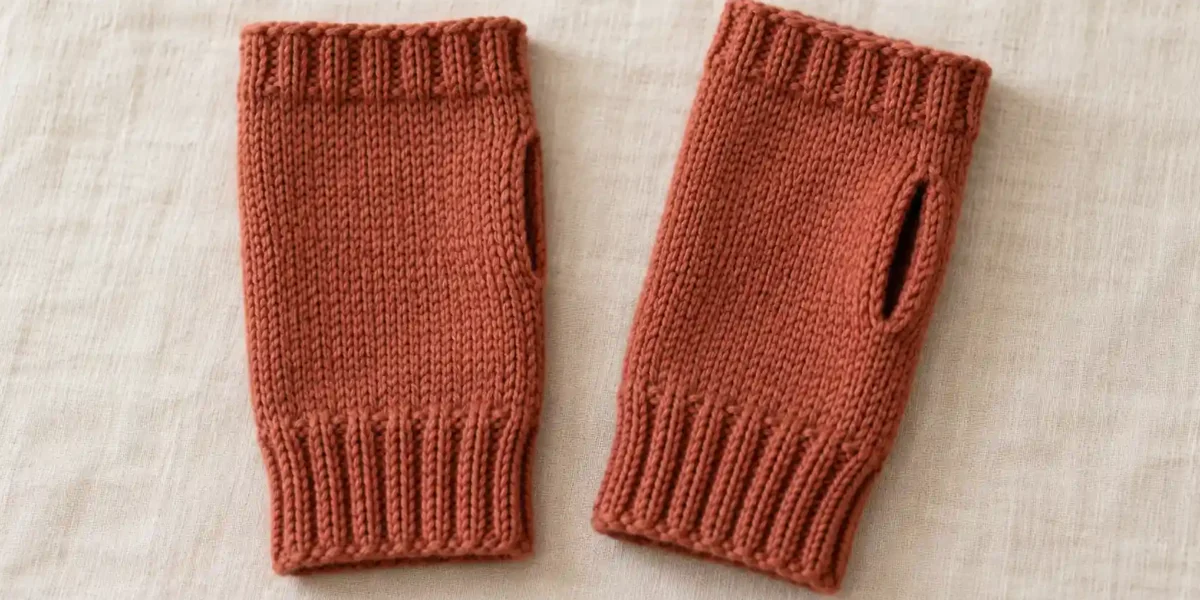
This free fingerless gloves knitting pattern makes a pair of simple mitts on straight needles. Each one begins as a flat rectangle with a ribbed cuff, a smooth stockinette body and a shorter ribbed top. Sew the long sides together, leaving a gap for the thumb.
There are no individual fingers, picked-up stitches or thumb gussets. Both pieces are identical; you place the seam at the thumb side when wearing them. The three size options are based on palm circumference, with a separate chance to check the thumb opening before finishing the seam.
Design note: Stitch counts and sizing calculations have been checked, but this new pattern has not yet been sample knitted. Fit, seam take-up and yarn allowances still need practical confirmation. The featured image is an AI-generated design visualization, not a photograph of a test-knit sample.
Fingerless gloves knitting pattern at a glance
| Detail | Pattern information |
|---|---|
| Skill level | Easy: knit, purl, ribbing and seaming |
| Construction | Two identical flat pieces; one seam with a thumb gap per mitt |
| Yarn | Smooth medium-weight yarn, Category 4 |
| Starting needle | 4.5 mm / US 7; adjust for the required fabric |
| Reference washed body gauge | 20 stitches and 28 rows over 10 cm in stockinette |
| Approximate overall length | 16.5 cm / 6½ in; rib row gauge can change this |
| Sizes | Reference palm circumferences of 18, 20 or 22 cm |
Stockinette is also called stocking stitch. Here it is knitted flat: knit the right-side row and purl the wrong-side row, with a knitted edge stitch at each side for sewing.
Materials and yarn allowance
For a pair, allow 90 (110, 130) m, about 99 (120, 142) yd, for sizes S (M, L). Add about 25 m / 27 yd if you will not reuse the gauge swatch. These are planning amounts, not measured test-knit consumption.
You also need straight needles, a blunt yarn needle, scissors, a tape measure and four removable markers or lengths of contrasting waste yarn to mark the two thumb gaps. Circular needles can be used back and forth if you prefer; the stitches are not joined in the round.
Choose a soft yarn with enough recovery to return towards its original width after stretching. A smooth wool blend can make the stitches and seam easier to read. Swatch acrylic or cotton choices rather than assuming their stretch will match wool. The beginner's yarn guide explains what to look for on the label.
Measure your hand and choose a size
Wrap a tape around the widest part of the palm below the knuckles, excluding the thumb. Keep the hand relaxed. The finished mitt is planned slightly smaller so it stretches gently around the hand.
| Size | Reference palm circumference | Target mitt circumference after seaming | Cast on |
|---|---|---|---|
| S | 18 cm / 7.1 in | 16 cm / 6.3 in | 34 stitches |
| M | 20 cm / 7.9 in | 18 cm / 7.1 in | 38 stitches |
| L | 22 cm / 8.7 in | 20 cm / 7.9 in | 42 stitches |
The cast-on includes two edge stitches, one on each side. The planned seam turns those edge columns inside, leaving 32 (36, 40) visible body stitches. At two stitches per centimetre, that gives the target 16 (18, 20) cm circumference.
These are drafting measurements, not tested hand-size ranges. If you are between the reference measurements, start by comparing the larger option and your washed swatch's stretch. The mitt must pass over the hand comfortably; a good-looking gauge calculation does not justify an uncomfortably tight wrist opening.
Swatch and understand the two fabrics
Make a stockinette swatch larger than 10 cm and include a small ribbed section to see how the yarn behaves. Wash and dry it as you intend to wash the mitts. Measure the central stockinette without stretching: the reference is 20 stitches and 28 rows over 10 cm, approximately four inches.
The size table uses the stockinette body gauge. Ribbing pulls in, so the relaxed cuff width can be smaller. Its row gauge may differ too. The nominal 16.5 cm length is a guide; the written row sections and your actual measurements should both be recorded.
If you change the body count, keep an interior multiple of four, then add two edge stitches. That preserves the exact 2×2-rib instructions below. The gauge calculator can help with the arithmetic, but the repeat and seam allowance still have to be checked.
Abbreviations and row structure
- k / p: knit / purl.
- st / sts: stitch / stitches.
- RS / WS: right side / wrong side.
- BO: bind off, also called cast off.
- 2×2 rib: alternate two knit stitches with two purl stitches.
The first and last stitch are knitted on every row. Do not slip them. Instructions between asterisks are repeated the stated number of times; the two outer edge stitches are additional to those repeats.
For these counts, the rib row is the same on both sides: k1 edge; repeat k2, p2; k1 edge. The interior has 8 (9, 10) four-stitch repeats. Mark the face of the work after the cuff so you can identify the stockinette right side.
Conventional abbreviations are listed by the Craft Yarn Council.
Full pattern: make two identical pieces
1. Cast on
Cast on 34 (38, 42) stitches for size S (M, L), leaving a comfortable edge. A starting slipknot counts as the first stitch. Check the count before working the cuff.
2. Work the lower cuff
Every cuff row: K1; repeat k2, p2 8 (9, 10) times; k1.
Work 12 cuff rows in total. At the body reference row gauge, that is about 4.3 cm / 1¾ in, but ribbing may measure differently. Keep 34 (38, 42) stitches.
3. Work the smooth body
Body Row 1, RS: Knit every stitch.
Body Row 2, WS: K1, purl until one stitch remains, k1.
Repeat these two body rows 14 times, giving 28 body rows. You have now worked 40 rows in total from the cast-on, excluding the cast-on itself. The smooth body is about 10 cm / 4 in at the stated body gauge.
Use the stitch counter to record cuff and body sections separately. A marker at the start of the body is also helpful when making the second mitt to match.
4. Work the top rib and bind off
Work the same rib row as the cuff for 6 rows: k1; repeat k2, p2 8 (9, 10) times; k1.
There are now 46 knitted rows in total. Bind off in the established rib without tightening the opening. Leave a sewing tail of about 60 cm / 24 in and draw it through the final loop. Knit the second piece to the same counts and section lengths.
Mark and sew the thumb opening
1. Wash and mark the actual pieces
Wash and dry both pieces according to the yarn label, without stretching them into an assumed size. Lay each with the cast-on cuff at the bottom and the smooth knit face visible.
On each long row-end edge, mark 7.5 cm / 3 in above the cast-on edge, then 11.5 cm / 4½ in above the cast-on edge. These marks define a 4 cm / about 1½ in gap. Match the marks on the opposite long edge of the same piece.
These positions are a starting point for an adult hand, not a universal thumb placement. If you changed the cuff length or have a different thumb position, move the marks on both edges together before sewing.
2. Join the lower and upper seam sections
Bring the long sides together with the right side outside. Starting at the cuff, use a soft mattress seam just inside the outer edge column on each side. Match rows and sew up to the lower pair of marks. Secure and weave in that sewing end without closing the gap above it.
With a separate length of yarn, sew from the upper pair of marks to the top edge. Leave the space between the two marks completely open: this is where the thumb goes. Secure each end with a small stitch through nearby seam fabric so the opening does not immediately pull apart. Avoid hard knots against the hand.
Try the mitt on gently before weaving every sewing tail away. The thumb should pass through the gap without pulling the hand opening down. Enlarge, reduce or reposition the gap if necessary. Repeat for the other mitt, matching the final opening rather than blindly repeating an uncomfortable placement.
3. Finish the pair
Weave in the remaining ends and let the mitts rest after the fit check. There is no separate left-hand and right-hand shaping: turn each mitt so its opening sits at the thumb. The opposite thumb placement when worn creates the pair.
Adjustments that keep the instructions consistent
To add body length, insert a complete two-row stockinette pair before the top rib. At the body gauge, two rows add about 0.7 cm. Move the thumb marks only if the desired opening position changes; do not automatically stretch the gap to match the added length.
For a wider body, add a four-stitch interior repeat, keeping the two edge stitches. At the reference gauge, four body stitches add 2 cm of circumference after the planned seam. Check cuff comfort and the actual hand fit again.
If only the row gauge differs, the row gauge mismatch guide explains why the body width and length need separate decisions. Do not change a working stitch gauge solely to force the same row number.
Frequently asked questions
Are these gloves or mittens?
They are fingerless mitts, often searched for as fingerless gloves or wrist warmers. They have an open top and a slit for the thumb, without individual fingers or a knitted thumb tube.
Do I need double-pointed needles?
No. The pieces are knitted flat on straight needles and then seamed. A circular needle can also be used back and forth.
Do I knit a different piece for the left hand?
No. Make two identical pieces. Place the seam opening on the appropriate thumb side when you wear each mitt.
My thumb opening pulls. What should I change?
Check the gap's height and position before changing the whole mitt size. Undo enough seam to adjust the opening, then check whether the body and wrist are comfortable as well.
Can I make the cuff longer?
Yes, but a longer cuff moves the thumb position farther from the cast-on. Add cuff rows deliberately, then place the seam markers on the actual hand rather than keeping the original distances without checking.
Keep a record of the fit
Write down the washed gauge, selected count, section lengths and final thumb-gap position. Record actual yarn use after sample knitting. Those details make a matching second pair easier than a guessed “one-size” label. Find the growing collection in the free knitting pattern library.